
Canceling Kindle Unlimited is as easy as pie, even for anyone who started using the service newly. All you have to do is to head to “Manage Your Content and Devices” and, of course, sign in to your account with Amazon. Then locate “Manage Membership” and click on “Cancel Kindle Unlimited Membership.” Thereafter, select “Cancel Membership” and consider it done. Do not be bothered that your membership would remain active after that; that’s how it works. It would remain active until the next billing date; when it passes, you will lose access to all the content you had accessed.
Unless the world has left you behind, you should know that books have gone beyond being an ink-on-paper affair. People can now access and read books and periodicals practically through any device that can display text on a screen. However, there are specialized devices specifically designed for reading, and they have since been embraced by readers across the globe for the portability advantage they have over printed books: an e-reader can contain thousands of books, and one can carry it about. Although these mobile electronic devices designed primarily for reading have raised some concerns, particularly in terms of the presumed threat they pose to the publishing industry, e-readers are here to stay.
What Is Kindle Unlimited and Guide On How To Cancel Subscription
Several e-readers have led the revolution of the publishing industry. The most popular among them include Onyx Boox, PocketBook, Bookeen, Barnes & Nobel, Kobo, and of course, Amazon Kindle. Through the series of e-readers the American multinational technology company offers, people can access e-books, magazines, and other digital media of that sort on the Kindle Store. And with Kindle Unlimited, avid readers get to read as much as they want from the more than two million titles, thousands of audiobooks, and select magazines availed on the platform, all for a $9.99 monthly subscription fee. The good thing is that you can cancel your subscription anytime you want; below is a detailed step-by-step guide on how to go about it.
Step One: Log on to Your Amazon Account and Navigate to “Kindle Unlimited”
If you are subscribed to Kindle Unlimited, then you have an Amazon account, and canceling Kindle Unlimited begins with logging on to the account. You don’t need to be told how to do that, do you?
Now that you are successfully logged in, you have to locate and navigate to “Kindle Unlimited.” To do this, drag your cursor to the inverted triangle on “Account & List” found on the right side of your screen, as shown below:
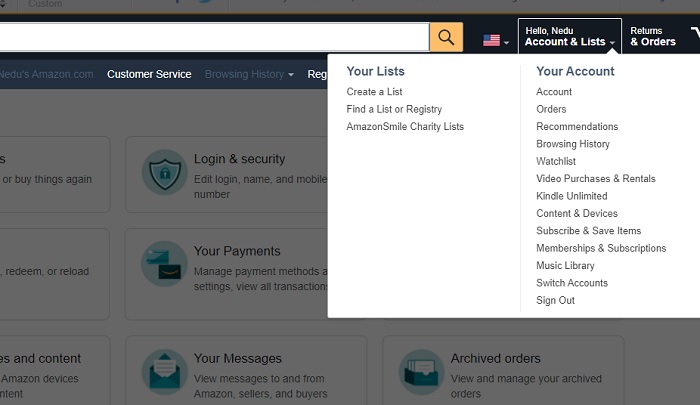
Step Two: Click on “Kindle Unlimited” and Navigate to “Manage Subscription”
If you would be canceling Kindle Unlimited and other Amazon services you are subscribed to, you should click on “Membership & Subscription” from the drop-down menu shown in the image above. Through it, you would find all the subscriptions you have. Otherwise, click on “Kindle Unlimited” and then on “Manage Subscription,” which is located on the right side of your screen.
Thereafter, navigate to “Advance Controls” and then click on “My Kindle Unlimited Settings” so that you can proceed to cancel your Kindle Unlimted subscription.
Step Three: Locate and Click on “Cancel Kindle Unlimited Membership”
Now at the final stage of canceling Kindle Unlimited, all you have to do is to locate “Manage your Kindle Unlimited Membership.” You should know what to do from there but for the avoidance of any doubts, click on “Cancel Kindle Unlimited Membership.” You will find it under “Manage Membership,” located on the left side of your screen.
At this point, you have indicated that you want to opt-out of the subscription. So, you will be presented with a confirmation page to see the cancellation through. You will be asked this: “Are you sure you want to end your membership?” To get it done, click on “Cancel Membership.”
As stated earlier, your subscription will remain active until your next billing date. In line with that, you will be taken to a confirmation page that states: “Thank You! Your membership has been canceled”. The page would also inform you when your membership will end and that you will no longer be charged.
How To Confirm You Have Successfully Cancelled Your Subscription
To avoid surprises, anytime you end your subscription to services that renew automatically, you should double-check and ensure that the service provider successfully carried out your request. For canceling Kindle Unlimited, there are a few ways to verify if it went through, but checking for confirmation email is probably the easiest.
Amazon does send notification emails for practically any changes to your account. So after you have canceled your subscription to Kindle Unlimited, lookout for an email from the multinational technology company. Of course, the email to check is the one you used to set up your Amazon account.
The email should confirm that your Kindle Unlimited membership will not be renewed. It also comes with a button to click on if, for whatever reason, you would like to keep enjoying your access to Kindle Unlimited.
What Is The Amazon Kindle Unlimited All About?
It was in November 2007 that Amazon launched its Kindle Store, an online e-book store. Roughly six years later, sometime in July 2014, the company introduced the Kindle Unlimited subscription service to the store. The aim was to give readers with massive appetites unlimited access to books.
When it was introduced, the service offers access to about 638,000 titles and more than 7,000 audiobooks. This has now grown to more than two million titles across a wide range of genres for a monthly subscription fee of $9.99. The company sources the book through various publishers and pays the authors using a per-page rate.
Users who are considering subscribing to the service get a 30-days free trial. After this, they will be charged $9.99 every month until they cancel the subscription, which can be done anytime they want. At the moment, only readers in the United States can access the Kindle Unlimited service on Amazon.com. This does not mean the service is not available in other countries; it only means that users in other countries can only sign up for Kindle Unlimited through their local Amazon marketplace.