
The advent of E-books has made it easier for bookworms to have a library sitting in the palm of their hands; even for book lovers who still love print books, eBooks afford an accessibility and flexibility that is undeniable. However, there are a lot of bookworms who still find it a bit challenging to navigate E-readers like the popular Amazon Kindle device. The Amazon Kindle E-reader is a flexible and innovative E-book library device that allows users buy, download, read and browse through books, magazines, newspapers as well as other digital print materials online on the Kindle Store. There are some Amazon Kindle tips and tricks every user should learn in order to make their digital Athenaeum navigation on the kindle device fun, interesting and seamless.
Here are 15 Amazon Kindle Tips and Tricks that are not very popular but highly efficient and necessary.
1. Let Your Circle Know Your Reading Journey by Connecting Your Social Media Accounts to Kindle.
If you will like your social network to recognize you as a bookworm, or you just like to share your reading list to your social media, Amazon kindle allows you to link your social media accounts like Twitter and Facebook to your Kindle account. This feature also allows you to share passages and excerpts from an E-book to your social timelines instantly. Amazon currently only supports three networks: Twitter, Facebook, and Goodreads.
Here is how to connect your social media to your kindle;
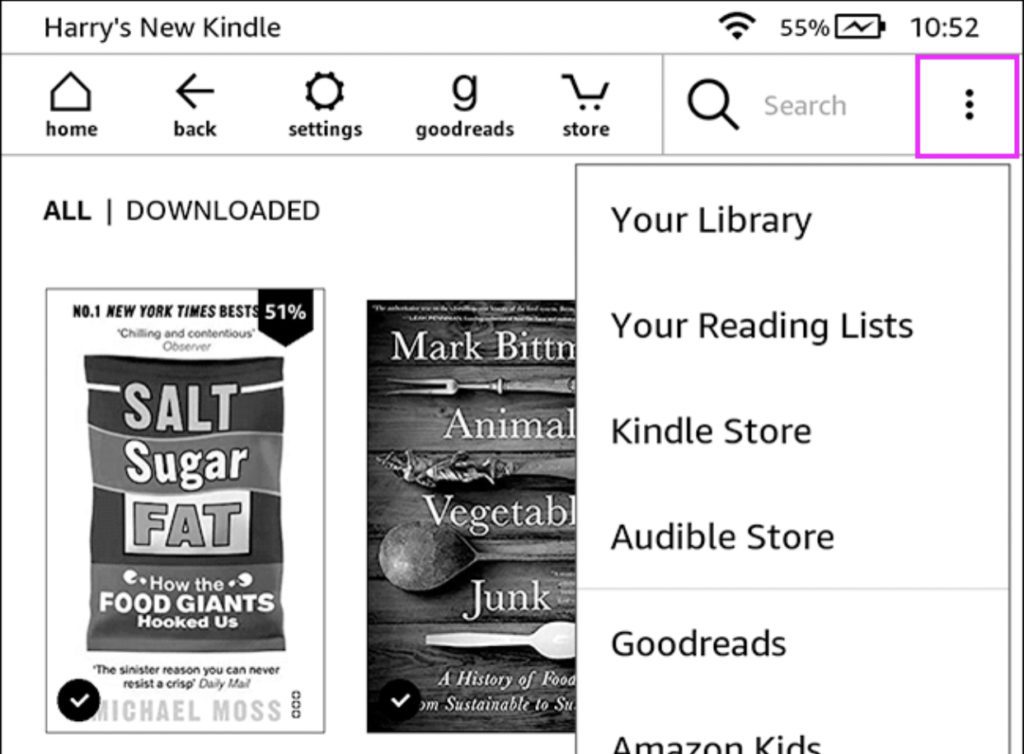
Make sure your Wi-Fi or 3G Network is On. Tap on the three tiny dots on the top right side of your device screen, Go to Settings and then tap on My Account.
Go to Social Networks and then click the network one you would like to connect.
Alternatively, Go to Settings, and then navigate to “manage” which is just next to “Social Networks” setting and tap On select and then tap on “Manage Your Social Networks”
For example, To link your Twitter account, Tap on “Link Account” under Twitter and follow onscreen instructions.
After successfully connecting your social media, you can highlight any text or excerpt while reading an E-book and then tap the share button to paste it to your social media timelines.
However, to unlink your Kindle from a social network account, Go to “Settings“ navigate to “Manage Your Social Networks” and then tap on “Unlink Account”
2. Borrow E-books From Your Public Library
A lot of kindle users do not know that you can get eBooks on your Amazon kindle from your public library. Most users just presume that the only way to get eBooks on kindle is to purchase them from Amazon or download free Amazon kindle eBooks. However, you can have access to a library of free eBooks literally from you public library so long as you have a library card. With Amazon Kindle you can still enjoy the benefits of a public library. The process is a bit tricky and not as straightforward as walking into a physical library and borrowing a book, but once you have the set up on your kindle device, you can enjoy your public library at your fingertips.
Also, you are only allowed to keep the eBooks for a number of days and then it is automatically returned, plus not all books in your public library are available as eBooks. This service is only available for public libraries in the United States.
First check with your local library or the library of your choice and make sure they support lending with OverDrive, as OverDrive service is what is officially supported by Amazon.
You also need to obtain a library card if you do not have one. You may have to visit the library physically if you can’t get the library card online.
To start, visit the library website to be sure they support the feature. You can check the status of your public library on the OverDrive search map using a web browser and select “Visit Library Website.” Once you locate your library’s website, select “Sign In” and then enter your library card number.
Proceed to search for the eBook you want to read. You can use the search filters to see only “Kindle Books” and select the eBooks labeled as “Available.”
Then, select how long you wish to borrow the book, between 7-14 days and then click “borrow.”
Once you get a confirmation pop-up, click “Read Now With Kindle.”
Also Make sure that you are signed in with the same account as your Kindle device as you will be taking to Amazon’s listing of the book and then click “Get Library Book.”
The ebook will appear on your kindle device as Amazon confirms that you have checked out the book.
3. Just Like your phone, you can take Screenshots.
One of the Amazon kindle tips you need to know is how to take a screenshot on your kindle device. If you are trying to share an interesting page from your eBook to a friend and you don’t want to paste it directly to any of your social media networks, Amazon kindle devices can help you with that, when you take a screenshot. Just like your phone, you can also take screenshots on your kindle device.
Taking a screenshot with your Kindle device is easy and you don’t need any complicated buttons or clicks. Simply hold your fingers on the top left and bottom right corners or the top right and bottom left corners of your kindle device. A brief flash on your screen alerts you of the Screenshot.
However, you have to connect your kindle to a computer using your compatible USB cable to use the screenshot.
After you connect your kindle to your computer, locate the File labeled kindle on your file finder or explorer, open the Kindle folder and you will see the screenshot. Then export it for your use.
4. Highlights and Export all your favorite Lines, paragraphs, or Quotes.
When you read a book, there are some passages that you want to refer to. With the kindle e-reader you can highlight your favorite excerpts just like you can on a print paperback, only that this time you don’t need ink. The Kindle E-Reader gives you markers that help you locate passages that are profound to you in a tap of your fingers.
To Highlight passages you love, press and hold a word, it will get highlighted, then drag the highlight to draw over the entire passage or quote you want to highlight. The “Highlight” option will show up and then tap on it. The. The Entire text will be darkened to show that you have successfully highlighted the selected text.
You can also add notes on what you think about the highlighted text by adding notes. Press down the excerpt and then tap on “Note” and then write down what you intend to note. You can also explore your Notes by pressing the top of the book to pop up the Kindle footer. Then select “Go to” and then tap “Notes”.
For a collated overview of all the excerpts you highlight or note, check out the Notebook tool
For bookmarking, tap the top of the screen, to reveal the Kindle header and footer, then select ‘Go To’ to see a bookmark icon on the right of the kindle device screen, tap on the little icon to set a bookmark. You also always tap on the bookmark icon when the menu is not up, to find a list of your bookmarks.
5. Set Up A Personalized Home Library
The Amazon kindle E-reader home library also called the Amazon Household feature was introduced in 2014, and this is one of the Amazon kindle tips that allows members of the same family share books without hassles. So, spouses get to read same books without having to each purchase the eBook from the kindle store.
In order to set up a family library, first make sure your device is compatible with the feature by checking Amazon’s Family Library compatibility page, and also make sure your kindle device is updated to the latest software.
To set up, go to “menu” then tap on “settings”, navigate to “household & family library” then “add a new person” and then “add adult”
Once you tap on “add adult” enter the email address and password of the adult’s Amazon account and tap on “continue” to authorize the account as well as share payment Information.
You can choose to share all your eBooks or just some of them.
To add a child on the “Household & Family library”, under “add a new person” select “add child” and then enter the parental control password, child’s birthday, gender and name. Select your preferred titles for the child’s library, tap “next” and then “done” to set up the account.
6. Update your screensaver with your latest read
Your Amazon kindle device has its default screen saver, but you can have a cooler device by changing your screen saver to the cover of the current book you are reading, it is not a complicated process. Here is how to turn on the feature.
You first need to make sure that your device supports this feature, here are the Kindles that support this feature;
- The 7th, and 10th generation of Kindle Paperwhite
- 8th and 10th generation of Kindle
- The 7th generation of Kindle Voyage
- The 8th, 9th and 10th generation of Kindle Oasis
 After you have made sure your device supports this feature, check that it is updated to the latest software, and if all that is done; go to “settings”, then navigate to “all settings”, and then select “device Options” after which you navigate to “Display cover” or “show cover” and toggle it on.
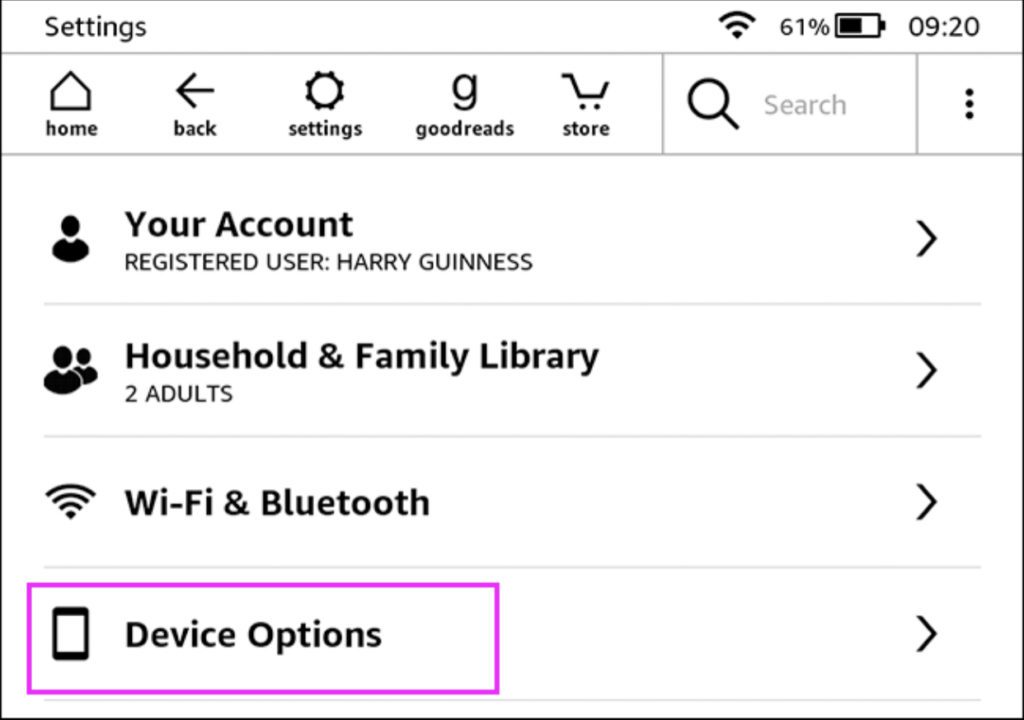
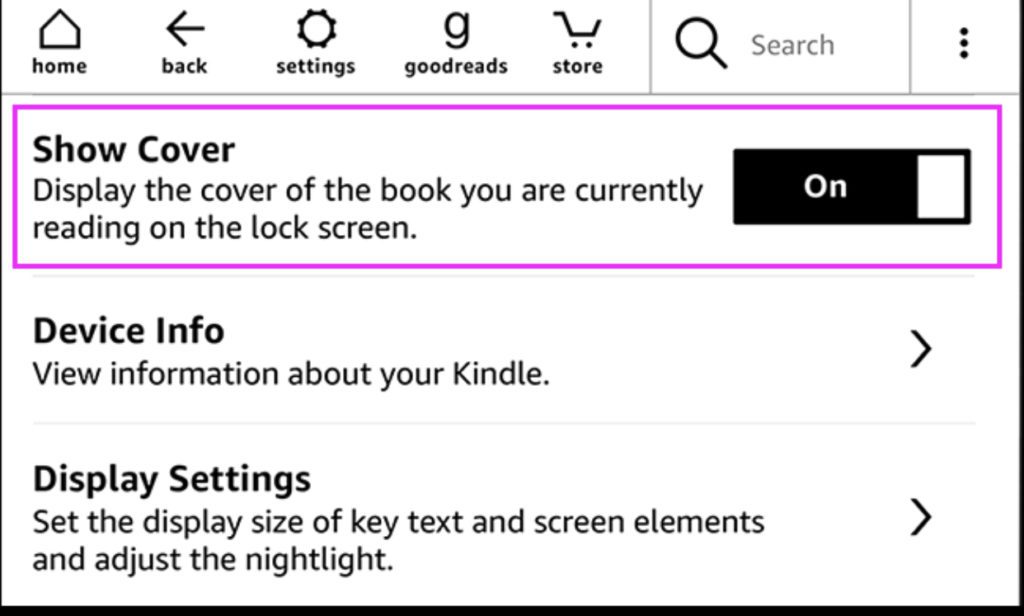
After this is done, your kindle will automatically display the cover of the book you are reading, whenever your kindle is locked.
7. Include your own Pdf Documents
One of the best Amazon kindle tips and tricks is the feature that allows you download your PDF files, word files and other documents into your kindle e-reader so you can read them. This kindle feature/tool also allows you get your university or school reading materials into your kindle e-reader. You can also add your work documents into your kindle device.
Here is how to navigate the process, first make sure the file is compatible to kindle, the following formats; .html, .doc or PDF are compatible.
Once you are sure they are compatible, send the file to your kindle email address as all kindle devices come with their own email address. To Find the address of your Kindle e-reader, go to the Amazon website and log in, then find the “Manage your Devices” option at “Manage Your Kindle“; then find the e-mail address of your Amazon Kindle device. Click on your Kindle device, and at the pop up you should see a @ kindle.com email address which You can change by clicking the “Edit” button, make sure the address you choose is approved.
Once you have gotten your kindle email address, email your file or files as you can send multiple documents to your Kindle email address.
Also, you can ask Amazon to automatically convert your files into a Kindle formats. To do that, add “convert” as the subject of your email and Amazon will handle the conversion.
After this, your files should appear on your kindle device, if you do not see them and your email was sent and kindle internet connected, then sync your kindle device by locating “settings” and tapping on “sync your kindle”.
8. Let Kindle do the Reading on an Audio Book
Sometimes we just want to sit back and relax and have our books being read to us. Amazon kindle also lets you download and play audio books. One of the Amazon kindle tips you should make use of is the audio book tool.
The Amazon Audible feature has been integrated into all Kindles that can read audiobooks. Click on the three vertical lines on the top of your screen to start, then Look for the Audible tab in the Kindle device store. After which you should browse through thousands of available titles, and when you download an eBook with the Audible feature support, you get the option to add professional narration at a discounted price; when you purchase an audiobook on one kindle device. You can also download them on any other Kindle registered on your Amazon account. You should know that listening to audiobooks on your kindle device will drain your battery faster than reading.
9. Lend a friend
Apart from borrowing books from your public library, you can also loan out eBooks from Amazon as to your friends and family even if your friends or family don’t own a kindle device; however if you lend a person your eBook, you cannot read that eBook for a period of 14 days which is the lending time.
To lend a book, log into the Amazon website/kindle account on a desktop and then look for the book you want to loan out. Check that it has the “Loan this book” option on the top left. Alternatively you can also go to your Manage Your Content and Devices page, and locate the book you want to loan.
Then click on the three-dot menu on the left side of the screen and then select Loan this title in the pop-up window. Next, you Enter the email address of the borrower and then click Send Now. If you don’t see the “loan this book” option, then the book cannot be loaned.
10. Switch to the kid-friendly format for your minors
If you want your children to be able to access your kindle device and read eBooks without mistakenly reading adult content; you can switch to a kid friendly mode suitable for kids by using the Amazon function created for that
You can access this function by clicking on the three vertical dots from the menu and then navigating to “Amazon Kids”. And then follow onscreen instructions. This feature is available on all kindle devices.
11. Play Games to declutter your mind
Sometimes, you want to do something else with your kindle device other than read, and that’s when playing games with your kindle device comes in. Although kindle paperwhite devices do not support the usual android games, there are some Amazon Kindle tips to get games. The Kindle Amazon store still offers some games referred to as “Active Content”. These games are specifically adapted to the e-ink displays of kindle.
To get one of them on your e-reader, go to the kindle store and then search for active content. After which you select your choice of game and then tap “deliver to” for your kindle e-reader. Games like jungle juice and sudoku are available to be installed.
12. Line up your eBook series
For readers who enjoy reading an ebook series, you can store all the parts of the ebook together to enable you gain access to all the books without having to search for them each time. This feature only works on books downloaded or bought from Amazon Kindle.
To start, go to “settings” then tap on “Device Options”, proceed to “Advanced Options” And then select “Home & Library” after which you will see the “Group Series in Library” option. This group series in library option can be turned on and off. To group your ebook series, simple turn on the group series feature. After turning it on, you will get a “Kindle has now begun grouping series in your library. You can view individual books by tapping on the series group cover, This feature can be turned off in settings.” Notification on your screen.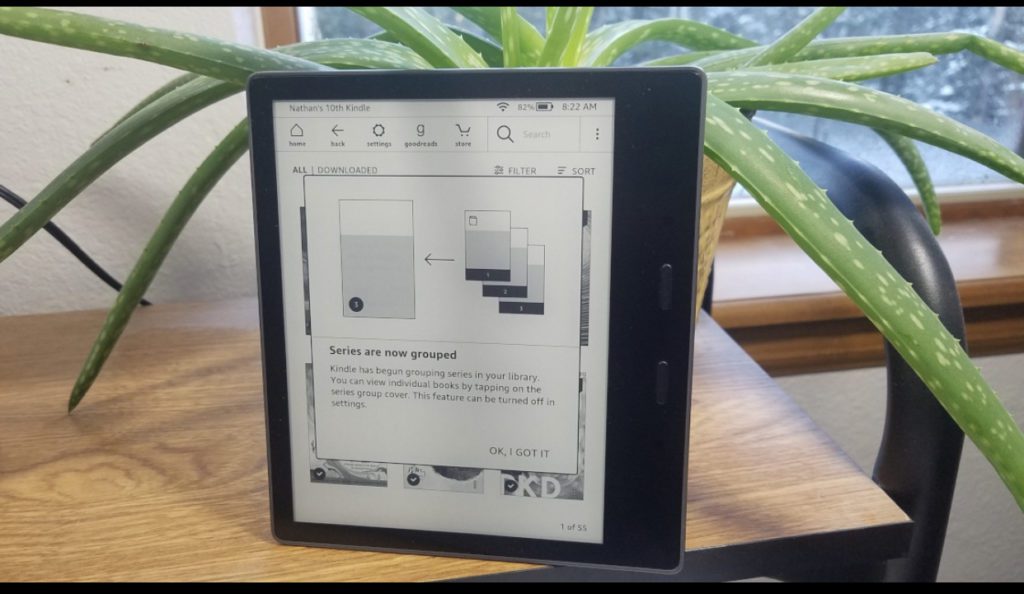
Soon as it is turned on, all eBooks that are a part of the series will appear on your Home Screen but under the cover of the first eBook in the series. The number of the books will also appear on the lower right of each book, including a link to view the full series on kindle store, at the bottom. If you cannot find this feature, update your Kindle software by going to “settings”, then device options, then advanced options then home & library and then update your Kindle. If you however, want the eBooks to appear independently, turn off the setting.
13. X-Ray to preview a book and decide if you want to read it
Another feature on Amazon Kindle that most people are ignorant about is the X-Ray feature. In 2011, Amazon Kindle Created a feature called Kindle X-Ray which allows users decide if they want to read a particular E-book by figuring out the book.
With Kindle X-Ray, you get to take a peek into an E-book, it is sort of like a movie trailer but for E-books.
The X-Ray feature is a book content enhancement tool, one of the Amazon kindle tips that allows kindle users to explore the “skeleton” of an E-book with a simple tap. The Kindle X-Ray feature helps you see all of the passages in the book, including topics, historical figures, specific ideas, places and fictional characters.
The Kindle X-Ray listings are sorted into two main categories “Terms” and “People”, which includes the most commonly used character names, ideas and locations. The feature will also give you descriptions and definitions for these terms.
To use the X-Ray Feature, Tap the three-dot menu at the top of the screen to display the toolbars, you should see a secondary toolbar which contains the X-Ray button.
Then Tap on the X-Ray button to see a list of, characters, terms and notable phrases. When reading books like Game of Thrones or Harry Potter, or other books with a large cast of characters, which number hundreds of characters, The X-Ray feature helps you keep track who is who, as provide you with a description of the character and also allow you sail between pages to refresh your memory.
However, If it happens that the X-Ray feature option on your Kindle is greyed out, it means that E-book does not have any X-Ray information available yet. Additionally, the Kindle X-Ray works for movies too, but only on the Kindle Fire model.
14. Prolong your battery life
Amazon Kindle devices have an impressive battery life, but they are also dependent on how frequently you use the devices. However, there are some tricks to help you preserve your battery life as well as tweak it to last longer even as you use it.
After you download the books or books you want to read, turn off your Wi-Fi or 3G data enabled mode, and then read on an “offline mode”. To turn them off, click on the three tiny dots on the right side of your screen to bring up Menu, tap on settings, and then select all settings. Tap on Wi-Fi and blue tooth and follow onscreen instructions. You can also turn on “Airplane Mode”
Another way of prolonging the battery life of your kindle device is to change the display settings. First, go to settings, tap and reduce Brightness and warmth. You can also turn off Auto Brightness if your kindle device model has the Auto Brightness feature.
Additionally, to prevent your battery from degrading over time, always unplug your charger whenever your device is charged up. Do not live your device plugged in once it is charged full.
15. Learn a Foreign language on your kindle
Amazon kindle devices are invested in exposing you to new knowledge either via books or new languages.
Apart from Kindle’s Word wise which is an inbuilt feature that is currently available in English and Chinese, there are also other Amazon kindle tips and tricks to learning new language on your Kindle E-reader.
To start, here are a few basic things you need;
A basic knowledge in the foreign languages. Do not expect to learn everything about the new language from the scratch on kindle.
You also need a compatible kindle device like the Second generation Kindle Paperwhite.
Get an eBook in the foreign language you are trying to learn and then download the ebook bilingual dictionary that translates that language to your native language. For example, you are trying to learn Spanish, Download a Spanish-English dictionary.
To activate the dictionary, tap “options” on the upper right of your device screen, tap “Settings”, and then locate “device Options” after which you get “Language and Dictionaries” select “Dictionaries”, For the language you wish to learn, set its dictionary as default.
Once you have your downloaded eBook in a foreign language ready, if you come across a word you do not recognize or know, simply tap and hold the word to get a definition. If your dictionary cannot recognize the word, use the “translate” function, by tapping “more” but you need Internet access for this.
However, the translation feature it does not add words to the Vocabulary Builder.
The vocabulary builder is an in built app that which is located under “options” at the upper right of your screen.
This feature collects all the words that you have looked up in the dictionary and compiles them for your practice.
Frequently Asked Questions about Amazon Kindle
Apart from the very helpful Amazon kindle tips and tricks that we have listed out, here are answers to frequently asked questions online about the kindle E-reader.
How do I get the best out of my kindle?
The Kindle E-reader is one of the best inventions for modern-day bookworms, plus it keeps getting better as Amazon just recently launched three new paperwhites, to enhance your experience on the device. Just like we have previously mentioned, kindle affords you several tips for you to get the best out of your experience. Maximize your time on the E-reader by;
Turning on the inverter mode to protect your eyes for when it seems too bright. This feature can be found in the accessibility section. From the top of the screen, swipe down to show the Quick Actions Option, tap Settings, then Tap Accessibility, and then proceed to Select your accessibility options. You can also adjust your font sizes in the accessibility options. Kindle also provides you with internet access while you are on the device, so you don’t need to “drop” your kindle for your phone when you don’t want to.
For privacy, you can set up a device passcode if you do not want just anyone flipping through your kindly pages. To set up a device passcode, go to settings, then tap on device options and then choose Device passcode to set up your device password.
You can also loan books to your friends via the Amazon 14 day loan policy.
If you purchased a new generation Kindle paperwhite, you can connect your Kindle device to speakers and headphones via blue tooth.
You can also personalize and name your Amazon kindle device as well as maximize your device for longer use.
How do I maximize my kindle?
Kindle devices can be a little pricey. You need to handle it with care in order to maximize your use of your kindle device.
- Do not leave your device in the hands of little children or pets.
- Always make sure your device is clean and free of dirt or grease.
- Keep away from moisture or water.
- Get a protective pouch to prevent it from cracking or breaking in case it drops on the floor.
- Do not leave your kindle device laying carelessly especially on beds or chairs to avoid sitting on the device and cracking it.
- Do not charge the device in extreme conditions.
- Contact customer service in case of any technical difficulties.
What do I need to know before buying a kindle?
In order to get the full value for your money and also have a clear thought process for decision making, here are some things you need to know before purchasing an Amazon kindle device.
- The screen size are of two types. 6 inches and 7 inches. If you like bigger screen sizes, you should go for 7 inches screen size kindle.
- For Price ranges, Amazon Kindle Devices are typically grouped into Basic kindle, Kindle Paperwhite and Kindle Oasis. Basic kindles are cheaper and Kindle Oasis is the most expensive.
- For a user who loves to read and collect books a lot, Kindle devices with inbuilt storage space of between 8 to 32gb come with a free cloud storage.
- If you frequently travel, you can opt for kindle device with 3G enabled options for when unable to connect to a Wi-Fi network.
- If you are worried about the effect of light on your eyes, some Kindles have a built-in soft light, although they are quite pricier.
- Not all books are on Amazon Kindle, at least not yet.
- Not all Amazon Kindle Devices are Text to speech.
What are the Different Types/Generations of Amazon Kindle?
The Amazon Kindle device was launched in 2007 as a single device. However, it currently has several series of kindle devices that have been upgraded over the years, and here they are.
- Amazon Kindle, First Generation, released on the 19th of November 2007. It was not sold outside of the United States.
- Amazon Kindle 2, Second Generation. Released on the 10th of February 2009. To promote Kindle 2, Stephen King released his Novella “Ur” exclusively on Kindle 2.
- Amazon Kindle 2, International. Launched on the 7th of October 2009, and made available to over 100 countries. It is physically the same as Kindle 2, it was only made available to some countries outside the United States.
- Amazon Kindle Dx. Released on the 6th of May 2009 to the United States only. It supports pdf files and has a larger screen.
- Amazon Kindle Dx International. Released on the 19th of January 2010. It was made available to over 100 countries outside the United States with 3G support for an international network.
- Amazon Kindle Dx Graphite. Released on the 1st of July 2010. It has an E-ink display. It was released Globally.
- Amazon Kindle Keyboard, Third Generation. Released on the 28th of July 2010 and is regarded as one of the fastest-selling Kindle devices Ever.
- Amazon Kindle 4 and Kindle Touch, Fourth Generation. On the 28th of September 2011, Amazon released the Kindle 4 and the Kindle Touchscreen.
- Amazon Kindle 5, Fifth Generation. Released on the 6th of September 2012.
- Amazon Kindle Paperwhite, first-generation. Released on the 1st of October 2012, and then released to international markets in early 2013.
- 6th generation Amazon Kindle Paperwhite 2, Second generation. Released on the 3rd of September 2013, and the Wi-fi version was released on the 30th of September 2013.
- Amazon Kindle 7, Seventh Generation. Released on the 2nd of October 2014. Amazon claimed a single charge could last for up to 30 days if you used it for only 30 minutes a day.
- Amazon Kindle Voyage was released on the 4th of November 2014. It was rated 9.1 out of 10.
- Amazon Kindle Paperwhite 3, third generation. Released on the 30th of June 2015, and was referred to as the best dedicated E-ink reader for money.
- Eight Generation Amazon Kindle, Kindle Oasis First Generation. It was released on the 27th of April 2016, Worldwide.
- Amazon Kindle 8, Released on the 22nd of June 2016, was an upgrade of the standard kindle.
- Ninth Generation Amazon Kindle, Kindle Oasis second generation. Released on the 31st of October 2017. It was also called Oasis 2.
- Tenth Generation Amazon Kindle, Kindle Paperwhite Fourth Generation. Released on the 7th of November 2018.
- Amazon Kindle 10, Tenth Generation. Released on the 20th of March 2019.
- Amazon Kindle Oasis Third Generation. Released on the 24th of July 2019.
- Eleventh Generation Kindle Paperwhite, Fifth Generation. Announced on the 21st of September 2021, and at the time of this report, set to be released on the 27th of October 2021.
What type of Kindle is my device?
After reading the above mentioned types and generations of the Amazon Kindle devices, you may be wondering what generation or type of Amazon Kindle device you have got, here is how go find out.
To find out which of the Kindle device type or generation you have, You need your device serial number. Every Amazon kindle device has its own unique prefix of letters of its serial number. To get the serial number of your device; follow this simple steps;
- Tap the three tiny dots on the top right of your device screen to open up the menu.
- After the Menu option pops up, Tap settings, and when it opens up, tap on Device options.
- Under Device options, tap device info.
- The Device info option will reveal your device serial number and firmware version.
How do I set up my Kindle?
So your kindle device just arrived, here is a step-by-step guide on how to set it up.
- After unboxing your device, turn on your kindle by pressing the power button which may also be located at the back of the device.
- After the screen comes up, go ahead to select your preferred language from the many languages options by tapping it, and then tap “Next” to confirm your language selection. Kindle has about 12 language options including Deutsch and Chinese.
- Kindle takes a few moments to boot and set up, after which you should select the “Get Started” option.
- If your Kindle device is 3G enabled, it will connect you to the Internet automatically, or you can set up a Wi-Fi connection for Faster service for devices that are not 3G enabled. Tap “connect to Wi-Fi” to see your available Wi-Fi networks and connect to the Wi-Fi of your choice.
- After connecting your device to the Internet, tap on “Use an existing Amazon account” to register your Kindle to your Amazon account. If you do not have an already existing account, tap on “Create New Account” and then follow the instructions displayed onscreen.
- For payments, be sure to select a “one-click payment method” for an easy shopping experience.
- Go ahead to connect your kindle to your social media accounts as we already mentioned above, you can also select “connect later” to do this at a later time.
- You can also set up parental control by following onscreen options.
- You will be asked if you will like to join Kindleunlimited which gives you access to selected kindle audiobooks and books for a fee monthly. Follow onscreen instructions for options.
- Your device is ready to be used after a short tutorial which will pop up afterward to help you navigate your kindle device.
What are the Pros and Cons of using a Kindle device?
Over the years, Amazon kindle has upgraded its kindle device to enhance the experience. However, there are Pros and Cons to using the Kindle device. Here are some of them;
Pros of using the Amazon Kindle device.
- Long battery life: Kindle Paperwhite has pretty much impressive battery life. You can go weeks without charging the device. It doesn’t require constant charging.
- Flexible Font size: You can always choose your desired font size and style to suit your reading.
- Affordability: There are varieties of cheap books on kindle, also, Kindle formats of some recent books are cheaper than paperback print.
- Easy access to Libraries: A lot of libraries in the United States allow you to check out their eBooks on Amazon Kindle for free.
- No ink Mess: The markers on the Kindle E-readers are electronic. You can always highlight your preferred passages without messing them up with ink when compared to Paperback prints. You can also bookmark your pages with ease.
- No Baggage Limit: You cannot possibly travel with a thousand paperback print books, however, the kindle device affords you the convenience of thousands of books in the palm of your hands.
- Free Books: There are a lot of free eBooks on Kindle to choose from.
- No Lost pages or Torn pages: One of the common challenges bookworms face with paperback prints is the likelihood of torn or lost pages, with kindle, nothing is torn or lost.
- You don’t need light: Even in the dark, you can always read, you do not need to shine a light on your book to read in the dark just like in the case of paperback prints.
- Dictionary and Translator: You do not need to carry a dictionary with you for new words. By tapping on the word, you get definition, Wikipedia as well as translation options.
Cons of using the Amazon Kindle device.
Despite how awesome the Amazon Kindle device is, there are still some downsides to it, here are some of them.
- Black and White: There is no color, it is all in black and white. For now, the Kindle device does not have colors, and all you get is white and black. Except for the Kindle Fire with colored LCD.
- It is not a paperback print book: There are still people who prefer the good old paperback prints, and for such people, Kindle will never feel like a book to them, despite the convenience.
- Ban: You can get banned and lose your account if you violate any of the Amazon Kindle device policies.
- Damage: It is an electronic device. Someday it may get damaged and require repair.
- The strain on the eyes: Despite the Kindle e-ink light, looking at a screen for too long causes strain on the eyes. Natural light on paper books is still considered much easier and safer on the eyes.
- Can’t give out your kindle device: Bookworms usually lend and borrow paperback books from each other, however, it is not the same with kindle. Although there is a feature for lending the e-books on kindle to your friends, it is not the same feeling as sharing your paperback books, also, you can’t give out your kindle device.
- No Signal, No books: You need the internet to get the best out of your kindle device experience.